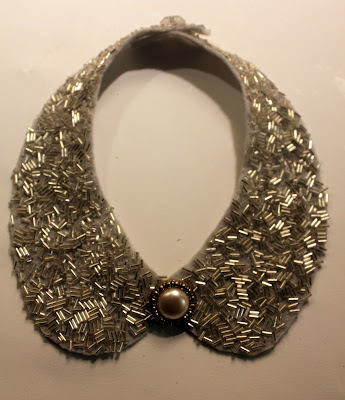
DIY: Peter Pan Embellished Detachable Collar
YES! I finally was able to accomplish one of my projects on my To-Do List. I decided to take a break from job apps and stop by the craft store yesterday. I picked up some pieces of felt, which were on sale for 5 for $1! And I decided I would work on my DIY collar.
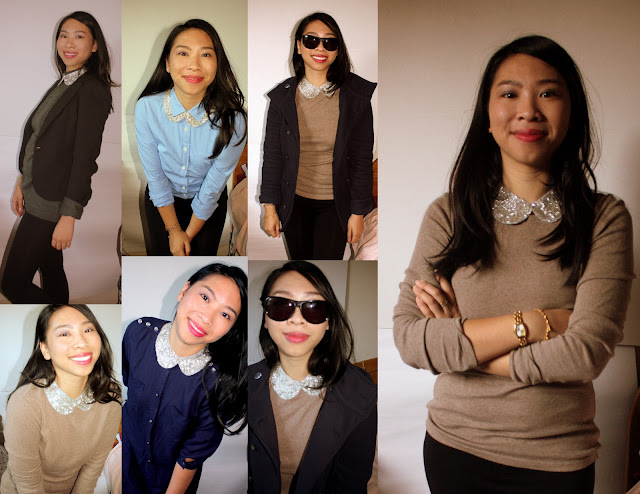
This is what the finished product looks like and the many ways I decided to style my outfits with my new accessory:
For this project you will need the following:
-A piece of felt
-Fabric Glue
-Some sort of embelishment (beads, sequins, buttons)
-Scissors
-Tape measurer
-A wide paint brush
-A needle and thread
1. So the first thing you need to do is measure the circumference of your neck. I measured mine to be ~15". Then I placed the tape measurer on a piece of white paper in the shape of my neck. It sorta looks like an alien head (ok, weird description but totally true). So the alien head circumference should be around 15".
2. Once you have the alien head down that measures out to be the circumference of your neck... you can draw out what shape you want your collar to look like. I chose the peter pan collar but you can try doing a scalloped collar, or maybe the pointy collar that we usually see. It's all up to you!
3. Ok, my sketch was not symmetric. So, if you aren't sure if what you traced out for your pattern is even on both sides... just half it down the middle and cut it out according to whatever shape you want so you can be sure it is even on both sides.
4. Now you can use this pattern .. I scotch taped it to a piece of felt and cut out my felt collar according to the stencil. Also I made a vertical cut at the top part because thats where I will add a button and slit to fasten the two pieces together. By the way, the felt that I used is a light blue gray color and made from recycled plastic bottles!
6. Then sprinkle your beads like glitter and use a scrap piece of paper to pressed down on it to make sure it sticks. And continue to do so but leave about an inch of space at the top part of the collar. Warning, it is a slightly messy process and you are likely to get glue on your hands. And Aleene's glue smells like really bad cheese. Note to self: Spray lots of perfume on my collar.
7. I decided that I didn't like the ribbon idea of fastening the collar, so I decided I would go with a button. I would aso try on the collar to make sure you have a good idea of where to place the button and make the slit.
10. Tada! You have your own beaded detachable collar!
11. You can also add other embellishments. Here are some examples:
I've seen a lot of beaded and sequined clothing and accessories lately and I think this is a great compromise for me because it is affordable and versatile. I only spent 20 cents on felt. The beads were from a left over project when I beaded my dress and I already had glue and buttons! So not bad for wanting to add a little pizzaz to your wardrobe. Also, there will probably be some bead/embellishment shedding just due to the fact there may be pieces that did not get enough glue. But do not let this stop you from making one!
This is what the finished product looks like and the many ways I decided to style my outfits with my new accessory:
(Note: You might think... really? You made a collage of yourself? I swear I am not vain and I really do not like taking this many pictures of myself but I thought it was a good way to show the versatility of the detachable collar!)
-Fabric Glue
-Some sort of embelishment (beads, sequins, buttons)
-Scissors
-Tape measurer
-A wide paint brush
-A needle and thread
1. So the first thing you need to do is measure the circumference of your neck. I measured mine to be ~15". Then I placed the tape measurer on a piece of white paper in the shape of my neck. It sorta looks like an alien head (ok, weird description but totally true). So the alien head circumference should be around 15".
2. Once you have the alien head down that measures out to be the circumference of your neck... you can draw out what shape you want your collar to look like. I chose the peter pan collar but you can try doing a scalloped collar, or maybe the pointy collar that we usually see. It's all up to you!
4. Now you can use this pattern .. I scotch taped it to a piece of felt and cut out my felt collar according to the stencil. Also I made a vertical cut at the top part because thats where I will add a button and slit to fasten the two pieces together. By the way, the felt that I used is a light blue gray color and made from recycled plastic bottles!
5. So for glue I used Aleene's fabric glue... I really think I have had this since highschool ... which was about 8 years ago. Am I sure my glue is still good? Nope... but I am too cheap to go back to the store and buy more. Basically, just use your paint brush to spread the glue (this one dries clear so I don't have to worry about the color of the felt not showing up).
8. I added extra glue to the side of the slit to prevent extra tearing. But make sure you don't glue the two side of the slit together! Then the button can't go through.
9. Carefully add glue and sequins around the slit and ends
11. You can also add other embellishments. Here are some examples:
I've seen a lot of beaded and sequined clothing and accessories lately and I think this is a great compromise for me because it is affordable and versatile. I only spent 20 cents on felt. The beads were from a left over project when I beaded my dress and I already had glue and buttons! So not bad for wanting to add a little pizzaz to your wardrobe. Also, there will probably be some bead/embellishment shedding just due to the fact there may be pieces that did not get enough glue. But do not let this stop you from making one!
Check out other DIY bloggers who have attempted similar projects to this one: Design Diary, Because I Am Addicted, Honestly WTF, and the list goes on and on! Ok, back to job apps for me!


nice!!!! loving the chain and buttons finish. its gorge!!
ReplyDeletehttp://myafricancloset.wordpress.com/
nice job!! i'm impressed :)
ReplyDeletehttp://cocofashionsmitten.blogspot.com/
Very cute collar. Love it.
ReplyDeletePatience
www.justpatience.com
you did such a great job!! xx
ReplyDeleteThat is too cute. Well done!
ReplyDeleteStrut Mode
great idea! It looks very cute ;)
ReplyDeletehttp://lavienmode.blogspot.com
Lovely idea babe! Have to try it myself
ReplyDelete:-)
XXX
looks so good!
ReplyDeleteLOVE! I've been wanting to try this out. Thanks for the DIY.
ReplyDelete-Ly
http://www.lyzhang.com
This is such a great DIY and it looks fabulous on you! Thank you so much for stopping by my blog! xx
ReplyDeleteThis is such a cute idea!
ReplyDeletehttp://foodfashionandflow.blogspot.com/
omg so lovely :)
ReplyDeleteyour newest follower Michelle
http://pinklemonincrystal.blogspot.com
That is SO AWESOME! I love it.
ReplyDeleteTweeting a link right now :) Hope that's ok!
xx S
Le Fanciulle
Glad you ladies enjoyed the post and thank-you for your kind comments! Tweet away le fanciulle! :)
ReplyDeleteThanks for sharing!! The finished product looks great and I'll have to try it myself sometime :)
ReplyDeletehttp://thetinycloset.blogspot.com/
i LOVE DIY projects!
ReplyDeletelooks awesome!
great blog!
-Nina P.
ninasarafina.com
This looks awesome, I will definitely give it try!!
ReplyDeletewow. i cant believe you made that! its so beautiful!
ReplyDeletehttp://style-palate.blogspot.com/
I love your collar so much, the bead choice makes it for me! I made one too: http://desartsplastiques.tumblr.com/post/12230534098/diy-embellished-collar-what-youll-need-assorted
ReplyDeletethis is such a cool diy!!! xx
ReplyDeleteThat turned out really beautiful. Great job!
ReplyDeleteI LOVE IT SO MUCH!!!!
ReplyDeleteThank you :] I'll try it right now!
How creative! I'm going through a collar phase and I'm definitely trying this.
ReplyDeleteThanks for posting! :)
Love this collar! Might have to have a go at this myself at the weekend!
ReplyDeleteSusie X
theembellished.blogspot.com
This looks fun and affordable :D love the step-by-step shots so I can get an idea of how it'll go. Guess I'll give this a go with some scrap fabrics I have stashed away but not knowing what to with them so now I do :D.
ReplyDeleteAmz x
hypertofu.blogspot.co.uk
I love your art! Thanks so much for sharing it with us!
ReplyDeleteHow wonderful that you made collage of yourself! We artists are our own best models!
Also, self love is essential for health.
Best of luck,
Sanja, Toronto