DIY: No-sew Leather Clutch
Kina Grannis - In Your Arms
I was strolling around a craft store and noticed they sold pieces of 8.5"x11" leather for decent prices. I've been wanting to make a clutch for a while and I felt like this was the perfect material to work with.
So I bought brown and black leather pieces as well as some leather cement glue.
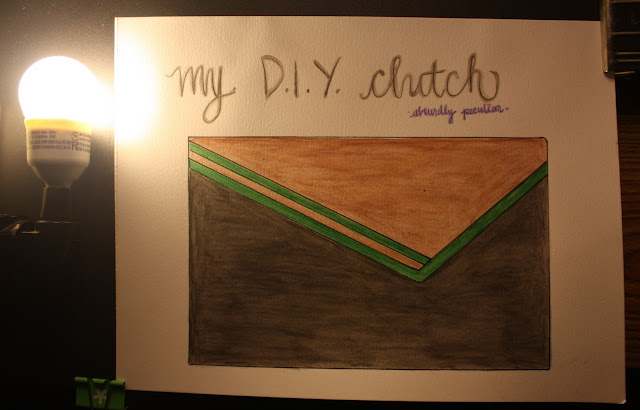
I also drew a sketch of what I kind of wanted it to look like... but in reality, it was just an excuse to use watercolor pencils.
Things you'll need:
-2 pieces of leather (size depends on how big or small you want to make it)
-leather cement glue
-scissors
-binder clips
-ruler
-pencil/marker
-scotch tape
-paintbrush
-something heavy, like a textbook or two
Step 1. Gather a piece of 8.5"X11" piece of leather (or whatever material you would like) and place the part that will be the inside of your clutch face up.
Step 2. Use your paintbrush to spread glue on the longer sides of the leather.
Step 3. Fold the piece in half and to make sure that the two pieces remain in constant contact while the glue dries...use binder clips or whatever clips you have to the clamp the sides. I waited about a day to make sure the glue really sets but I believe after an hour it was pretty good.
Step 4. So this part requires you to figure out how you want the top piece to look. I chose an asymmetrical look. I also decided to make a pattern on a piece of paper first before I cut the leather. I scotch taped my pattern to the leather and cut away.
Step 6. Tadaaa! You have your own leather clutch. Now you can embellish it with studs, glitter, or paint, OR leave just as it is!
Step 7. I decided to paint it because I was inspired by Chic Steals idea of painting leather with acrylic. I used painter's tape to make my design, sanded the pieces of leather that would be painted, coated the area with water downed acrylic, and finished it off with a couple final coats of just acrylic paint.
I really like how it looks...the only thing I can't figure out is which way it looks better, just the way it is or with this little skull embellishment. Oh, decisions!
What do you think about an ode to Alexander Mcqueen? Anyways, I will try to make an updated post with dimensions just in case you want to make a similar one! Updated, sorry for slacking on that!


You made this???? AWESOME! You are so crafty and talented. I love this and it has such an original look.
ReplyDeletehttp://foodfashionandflow.blogspot.com/
This looks great!
ReplyDeleteYou make it seem so easy.
Mel x
http://flourishedandsunkissed.blogspot.com
Nice work... I'm impressed!
ReplyDeleteI just found your blog and I LOVE IT! This is absolutely incredible. Where did you find the leather?
ReplyDeleteWould love for you to stop by my little piece of the blogosphere. I am doing a fun giveaway here is the link: http://www.lovelinds.com/2011/11/stella-and-dot-giveaway.html
xoxo Linds
That is awesome.
ReplyDeleteIt turned out great, I love the asymmetrical flap.
ReplyDeleteYou are SO talented! This looks wonderful and could easily be sold for a pretty penny. I love seeing people display their creative ideas.
ReplyDeleteSTYLE. SAVVY. CHIC
http://stylesavvychic.blogspot.com
Now that's cool.
ReplyDeleteOMG, this is totally unbelievable! It looks so chic and expensive!! Kudos, girly!!!
ReplyDeleteLove love love your blog! Following you now on Google Connect and hope you can share back the love by visiting my blog as well...Following me wouldn't hurt too...it'll make me happy :)
Much love from Canada~
so creative! Love that idea. :)
ReplyDeleteooh this is so clever and wonderful! must try this immediately!
ReplyDeleteyou did an amazing, amazing job! i love it!
ReplyDeleteVery nice, brava!
ReplyDeletehttp://thestyleattitude.blogspot.com/
you are so clever. this is a lovely DIY.. beautiful end result!
ReplyDeletehttp://missmollyfashions.blogspot.com/
This is such a cool DIY! I love it!
ReplyDeletexx
www.queenoffunkydiy.blogspot.com
So creative!!
ReplyDeletexx
This looks amazing, very professional!
ReplyDeletex
Michelle
www.michellesstylefile.blogspot.com
i can't believe you made that!! amazing craftsmanship. btw i love kina grannis :)
ReplyDeleteyou're brilliant. i love this. can't believe you made it. stunning. thanks for sharing, love. I've got a new fash trend report. Love to hear what you think. xo
ReplyDeletehttp://fashboulevard.blogspot.com/
I really enjoyed this post! I love your sense of style!Great tutorial|
ReplyDeleteFox House giveaway on my blog!
Take a look and if you like follow me, I’ll be waiting for you: Cosa mi metto???
This is super duper amazing I tell you..the stores are totally robbing us,, lol
ReplyDeleteloved ur blog..and following it now
http://wemakeupblog.blogspot.com
Love that you made this with just glue and no sewing! There are so many different ways to do the same project, and it's great for people without a sewing machine to have options.
ReplyDeleteI vote yes on the skull embellishment. Is it a necklace charm, or some kind of stud? How did you attach it?
Thank-you for stopping by and I appreciate all your comments!
ReplyDelete@Rachel: The skull was actually a necklace charm! It was a skull head attached to a bony hand and I cut them apart using jewelry pliers. I haven't attached it yet but I was thinking of either gluing it using Aleene's Platinum Bond Adhesive or hand sewing the top part (since it was for a necklace).
love it! I want to give it a try. You've inspired me!
ReplyDeleteMaria @ Orchard Bloom
i love the diy
ReplyDeleteTravel in Style
OH WOW!!!!! i love the result of this! Adore ur DIY idea :)
ReplyDeleteFollow u <3
Wow, amazing clutch!!
ReplyDeletex
Fantastic job! And I love your sketch!
ReplyDeleteThis is fabulous .You are amazing.Love your blog .Follow each other .
ReplyDeletethat is so cool ! love it !
ReplyDelete<3
pia
everlightly.blogspot.com
Ohoho - this is superbly amazing!!
ReplyDeleteSuper cool! <3
Vanesa
The-Bel (Fashion Blog, Online Shop)
THIS IS AMAZING. THE END!
ReplyDeletewow!! friggin fantastic!!
ReplyDeletexo
Bang & Buck
Great!
ReplyDeleteI really like your blog
ReplyDeleteif you want we can be followers
INCREDIBLE
OMG this looks amazing! Looks like a store bought clutch! Great idea!
ReplyDelete-Ivy
www.pocketfulofapples.blogspot.com
I LOVE THIS!
ReplyDeleteCheck out my giveaway, its MAC!
Summer-Raye
WONDERFUL post!Very interesting!
ReplyDeleteHI! my name's martina and I come from Italy... I'd like you visit my blog and if you want.... follow me! I wait you and your tips!
Thanks! kisses, Marti! ;DDDDD
Glamour Marmalade
Glamour and Fashion
Amazing :)
ReplyDeletehttp://dressedcrisis.blogspot.com/
wow!!nSuch a great clutch!! I just cant believe it holds only with glue? Did it stick together? It looks so cool!! How long did it take you`?
ReplyDelete♥♥Style-Roulette♥♥
xoxo,
Luísa
@ luisa: it hasn't fallen apart yet! i think it will hold as long as i don't try to fit humungous items in there. my phone, ipod, and small coin purse fit nicely in there. it took me about 3 days because i waited for the glue to dry for 1 day each time i applied it, but if you are impatient and can't wait that long, i am pretty sure the glue will dry within 1-2 hours and you can have the bag within 1 day!
ReplyDeleteThis comment has been removed by the author.
ReplyDelete