Posts

Showing posts with the label diy

DIY Idea: Black Keith Haring Cuff Bracelet
Image
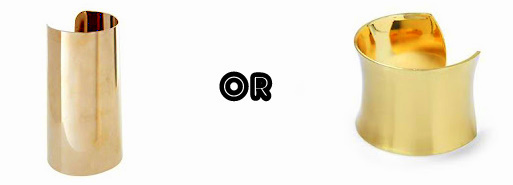
Have you ever seen something at the store or online and thought, I could totally make one for a fraction of the cost?  And then you start breaking it down in your head on how you would make that happen? No? Well, I do.  So here is me breaking down a Black Keith Haring Cuff Bracelet bracelet like I would in my head:   ASOS Modern Armour Cuff Bracelet$26.86 Hive & Honey Cuff Bracelet, $22     Sharpie's Markers Scribbles 3-Dimensional Paint           Keith Haring Cuff Bracelet, $165 The great thing about this project is you can custom make the design to whatever you want.

DIY Inspiration: Tribal Safety Pin Necklace

Image
I was looking up images on Google because I was thinking of using safety pins for this wall art idea I had and then I came across this picture:  Chioma Nnadi's (Vogue Fashion writer) wearing a Vena Cava Necklace And this other one: Vena Cava I am SO thinking about making one of these.

DIY: MARNI Necklace

Image
I've been wanting to make this MARNI Necklace for a while. The only way I could think of making this for as little money as possible was using polymer clay. So I went to JoAnn Fabric's and picked up all of my supplies ( Thanks for the giftcard NT!). Things You'll Need:   polymer clay, ribbon, jewelry wire, scissors, jewelry wire pliers/cutters, glue, an oven

DIY: Wall Art Using Paint Chips

Image
I decided the apartment needed new wall art that didn't cost me much money. So I headed to Home Depot and picked up a bunch of paint chips. I seriously thought I needed to be stealthy because I was taking around 6 chips of the same color, but now that I think about it... I doubt anyone cares I am taking too many free samples. And here is my finished piece: Things You Will Need To Do This Yourself: posterboard (for the background/the thing you will paste the chips on), glue (i used tacky glue), scissors, a ruler, a pencil, and lots and lots of paint chips (found at Home Depot, Loews, etc.), a frame This project cost me zero dollars, since everything I needed was either free or I already had it. So I would definitely want to make another one to go with the one I just made. Here are some other paint chip diy art projects that I would like to try: How About Orange Home and Garden Hopefully, I get it done soon. Maybe after I turn in another 2 apps. Also, I fi

DIY Inspirations

Image
I have been busy working on a portfolio that I want to send to a company (so that they can be amazed by my accomplishments and hire me.. I know wishful thinking), but I have been working so slowly and I am sure it is because I want it to be awesome and not due to procrastinating. :) So I haven't had a chance to work on any DIY projects or come up with any clever postings. So instead I give you a list of items I've seen that could potentially turn into DIY projects: 1. MARNI Necklace , $390 2. Oscar de la Renta Beaded Tassel Earrings , $395 3. Skulls Drawcord Bracelet , $26 4. Neiman Marcus Colorblock N-S Tote , $68 I don't guarantee anything, but I am leaning towards the MARNI necklace or Skulls Bracelet. I believe Stripes & Sequins did a DIY for earrings similar to these already and I already did a DIY on totes, but another tutorial couldn't hurt...so I guess time will only tell if I end up doing one of these! I leave you with a song that is making my work a li

DIY: Wall Art

Image
This past weekend, my friend wanted to add some art to her walls. At first we attempted this design from Make Under My Life : but then we realized we forgot to print the stencils and didn't want to mess it up. So then we decided to follow a DIY art project from The New Domestic : But the problem was that we didn't buy painter's tape as thin as the one they used. So we improvised by cutting smaller pieces of painter's tape and then we finally gave up on that because it took so long, and went with scotch tape. The whole process was super depressing because things kept going wrong...not printing stencils, buying 2" painter's tape, using scotch tape, buying translucent paint, but somehow it turned out ok. To make the paint less translucent, I mixed it with a little black acrylic paint.  So it turned into this dark green-like color. And using scotch tape didn't turn out to be such a bad idea. Things You Will Need :   painter's tape (in a decent

DIY: Refurbished Tote Bag

Image
I keep on blaming the Holidays for having a slump in the DIY idea/inspiration department.  I mean there are so many things you could technically DIY, but I haven't found a project that excited me, until this baby was brought home to me: Someone in my family asked me if I wanted this and the answer was no.  I know, I know...I can use it for so many things... groceries, library books, a lunch bag...etc. but lets be honest, it is plain ugly. I started thinking how it would either end up in a dumpster or be kept away in some part of the apartment (pretending that it will eventually be whipped out for something but truthfully, it will never see the light of day like so many of the free advertised tote bags I have).  So instead of dumping it/never fufilling its life purpose... I decided to fix it so it can live up to its potential. Lucky you, ugly tote bag! Inspirations for the design came from research for my Distracted... post; specifically, from the following:

Last Minute Gift Ideas for the Economical Gift Giver, Procrastinator, and Lover of All Things DIY.

Image
I just recently found out about DIY gift exchanges and thought about how cool that would be. But then I would need to make friends with people who actually enjoy doing DIY projects because I believe my friends and family in LA  would be too lazy to agree to this idea.  So instead of exchanging gifts I thought about giving DIY gifts. DIY gifts are amazing because 1) The giver saves money 2) A lot of thought and time is put into what the giftee shall receive 3) Very few people in the world will have a present exactly like it. So here are some ideas for people who haven't bought their gifts for friends yet and would maybe like to save some money. They could also make great stocking stuffers. You have 2 days left, which is plenty of time to buy materials and make one of these babies below! 1. Box Braid Necklace - Honestly WTF 2. Braided Hex Nut Bracelet - Honestly WTF 3 & 5. Polymer Jewelry Pieces - Absurdly Peculiar 4. Braided Woven Curb Chain Bracelet - The Dapper Bun 6. Po

Refurbished Purse: Paintified, Leatherfied, and Studified

Image
I found a purse that I probably bought years ago and never used. The material was probably very cheap and so it started tearing and peeling... so instead of throwing it away I decided that it needed to be fixed. Here are photos with my new and improved purse from my random photo shoot (as in I jumped out of the car and someone took these photos within 3 minutes time...I know, so professional).

My Unconventional Christmas Tree

Image
The Black Keys - Mind Eraser  I was thinking of buying a mini Christmas Tree this year.. but from the 17th-24th I will be visiting family in Phoenix. I decided it wasn't worth it to buy one, but it was so hard to break tradition and not get a tree! So I opted to use a jewelry tree that a friend gave me last year. Here is my version of a Christmas Tree for this year: The only thing I bought this year was glitter gel; everything else I had at home! So it was an inexpensive tree (yay! to saving money). Here are more details on the what and how of this decorated tree: 1. I already had these ornaments, but I felt they looked so blah. I decided to buy glitter gel (less mess!) to add a little something to them. 2 . I made these out of string, glue, water, and glitter gel following this.  Some of them didn't turn out so well because a couple of them wouldn't harden, so I used extra strength hairspray that I found laying around the apartment; hopefully, I didn't harm t

UGG® Australia: Design for a Cause

I first heard about UGG® Australia: Design for a Cause from Stripes and Sequins . I left a comment about how I thought it was a great idea and for such a good cause; as a result, I was contacted to see if I could spread the word and of course I said yes. If you are the creative type and love DIY projects, you should consider joining. It is free to enter and all you need to do is design your own pair of UGG® boots. The winning design will be produced and sold at select UGG® Australia retail locations in 2012 and a portion of the proceeds will go to Boys & Girls Clubs of America. The winner will receive $5000, an UGG® bag, a pair of your own design as well as global exposure. That's definitely a win-win situation there. Not only do you get to use that creative brain of yours but most importantly, you are helping people! Please submit your designs by December 26, 2011!

All My Bells Are Ringing

Image
Lenka - All My Bells Are Ringing Hope everyone had a good Turkey weekend! I am just way too excited for December... I already have a Christmas present wrapped and ready to go! I bought this wrapping paper last year from IKEA and I love the pattern on it! I used gold jewelry wire and wrapped it up with a Christmas color-themed bow... I really like how the gold looks against the wrapping paper. The card was made out of an index card. All of these items were just laying around my apartment... I wonder what I shall find to decorate my next Christmas present. While I come up with more projects and wait for materials to be shipped to me. I came up with a list of some great holiday themed DIY projects that I found.

DIY: No-sew Leather Clutch

Image
Kina Grannis - In Your Arms I was strolling around a craft store and noticed they sold pieces of 8.5"x11" leather for decent prices. I've been wanting to make a clutch for a while and I felt like this was the perfect material to work with. So I bought brown and black leather pieces as well as some leather cement glue. I also drew a sketch of what I kind of wanted it to look like... but in reality, it was just an excuse to use watercolor pencils. Things you'll need: -2 pieces of leather (size depends on how big or small you want to make it) -leather cement glue -scissors -binder clips -ruler -pencil/marker -scotch tape -paintbrush -something heavy, like a textbook or two

Home Decorating Inspiration

Image
So my friend is planning to move into her very own home next weekend and she was asking me to send her some on ideas on how to decorate her place. Of course, I got too carried away. I started emailing her too many links and I decided I needed to stop. Instead, I decided to collage my ideas (I know, I like making too many collages). So here are my favorites: 1. Apartment Therapy  - I so enjoy the color gray and I like how they used pillows to bring a touch of color to the room. Great idea for someone who isn't fond of a lot of color! 2. Covet du Jour  - Love the colors and how major pieces (i.e. couch, walls, floor) are pretty much neutral  while the pieces that give this room pizazz are its accessories (i.e. pillows, vase with flowers, lamp, and curtains). 3. Cupcakes and Cashmere  - Such a great idea for a side table. Not something I would necessarily have in my bedroom because I like to have sliding drawers.. but great for a living room, hallway, or guest room! 4. Unknown Sour

DIY: Wrap Bracelets

Image
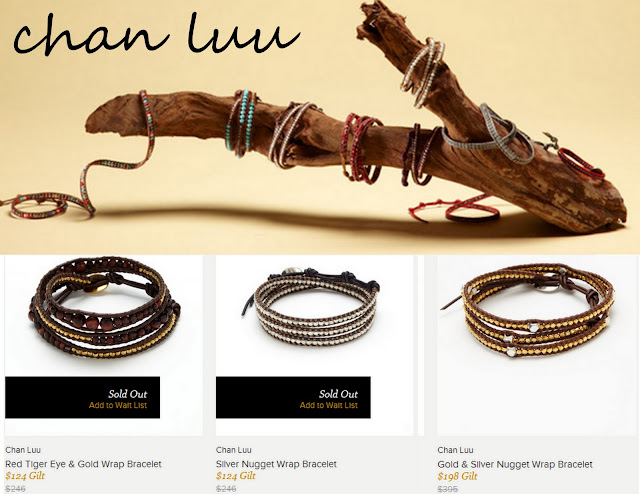
I was on GiltGroupe a couple days ago and was surprised... wrap bracelets by Chan Luu were selling for over $100 and were originally priced at over $200. Now I am not condoning people who choose to spend that much money on a wrap bracelet...seriously, if you have the money why not..but it's just that I don't happen to have that kind of cash to be spending $200 on one wrap bracelet! I was even more shocked at the pricing because a couple weeks ago, my friend sent me a DIY for wrap bracelets from HonestlyWTF . She actually made one recently for around $8. I know, Chan Luu probably used real gold and silver trinkets or what nots... but why pay $200 when you can get the same look for less? 

DIY: Peter Pan Embellished Detachable Collar

Image
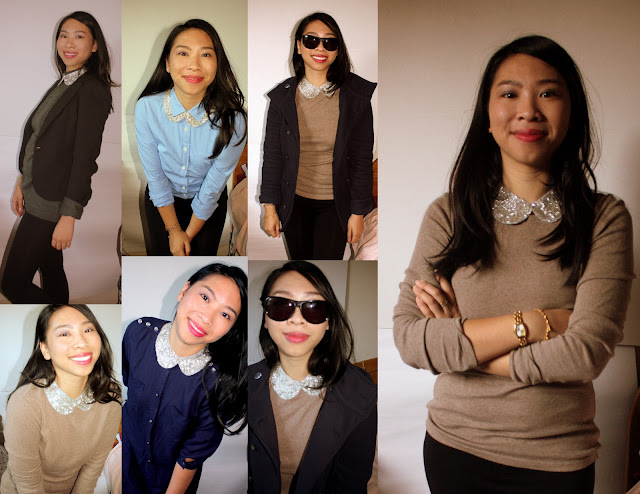
YES! I finally was able to accomplish one of my projects on my To-Do List. I decided to take a break from job apps and stop by the craft store yesterday.  I picked up some pieces of felt, which were on sale for 5 for $1! And I decided I would work on my DIY collar. This is what the finished product looks like and the many ways I decided to style my outfits with my new accessory: ( Note: You might think... really? You made a collage of yourself? I swear I am not vain and I really do not like taking this many pictures of myself but I thought it was a good way to show the versatility of the detachable collar!) For this project you will need the following: -A piece of felt -Fabric Glue -Some sort of embelishment (beads, sequins, buttons) -Scissors -Tape measurer -A wide paint brush -A needle and thread
Image
I actually have two videos for you all today. One is an awesome video on how to make a men's button down shirt into a skirt, dress, and/or top that I saw on That's Chic. How innovative is that?   The second video is a great song by Edward Sharpe and the Magnetic Zeroes called Home. It puts me in a great mood... I think it has to do with the whistling. And why shouldn't you be happy? It's Friday! Enjoy your weekend!

My Crazy DIY Ideas and What They End Up Really Looking Like....

Image
So as you know, as of lately I have been very inspired to go bead crazy on some clothing items I own. So I chose a dress.. this one in particular: It is a great dress in person, the bottom is two-tiered and flows beautifully. But when you look at in pictures, it looks super boring... borderline depressing. So I decided this is the dress that will be subjected to my awesome ideas.  Then I came up with designs to get an idea of what type of beads I was looking for and how much I would need. So here are those pictures: I thought to myself, not amazing... but enough for me to decide what beads I will be getting and how much. So then I went off to Joann Fabrics (did you know they take Michael's coupons?!? amazing!!). Then I gathered all my fabulous tools: Tools Included:  Black thread, sewing needle, beads After all my tools were gathered, it was time to bead away. So I was a little confused where I should start since I didn't settle on a design, so I decided to work on t